Contents
An operator who loads flat-sheet cutting parameters into a tube cutting job will get poor results — not because the parameters are wrong, but because tube cutting operates under five different physical constraints that flat sheet does not have. The most consequential one is focus position: the curved surface of a tube makes the laser's effective working depth shallower than on flat plate, requiring a more negative focus setting to compensate. Get that wrong, and adjusting speed and power will not fix the cut.
This guide covers all five differences in detail, gives reference parameter tables from GWEIKE production tests for 1KW through 6KW on carbon steel and stainless steel tube, and includes profile-shape guidance for round, square, and rectangular sections — the dimension that parameter tables alone cannot address.
All parameters apply to GWEIKE fiber laser systems with standard rotary axis tube cutting heads. For machine specifications and model comparisons, see the tube laser cutting machine overview.

Five Ways Tube Cutting Differs from Flat Sheet
These are not incremental adjustments to flat-sheet parameters. They are structural differences in the cutting process that require different values across every parameter column.
Focus position — same direction, larger magnitude
Thin carbon steel gas — N₂ preferred over O₂
Cutting speed — limited by rotary axis, not laser
Nozzle standoff height — fixed, not variable
Actual output power — stepped by wall thickness, not fixed at rated
Focus Position: Curved Surface Compensation
This is the single most important difference to understand before reading any parameter table. When a flat-focused laser beam strikes a curved surface, the effective depth into the material is shallower than on flat plate — the curvature means the beam is not striking the material perpendicularly at most points around the circumference. To compensate, tube cutting requires a more negative focus setting than flat cutting at the same thickness.
The compensation is larger for smaller diameter tubes (more curvature) and thicker walls (the beam must penetrate deeper). For large-diameter tubes (above approximately 100mm outer diameter), the curved-surface effect diminishes and flat-sheet focus values become usable.
For carbon steel oxygen cutting on thick tube, the focus direction reverses to positive — the same as on flat sheet O₂ cutting — with values ranging from +2mm at 2mm wall up to +5.5mm at 6mm wall. The curved surface effect on O₂ positive focus is less pronounced than on N₂ cutting, so the values stay closer to flat-sheet equivalents.
Profile Shape: Round, Square and Rectangular Tubes
The parameter tables in Section 4 apply to all three profile shapes — the laser parameters are determined by wall thickness, not profile shape. But profile shape determines how the machine must be programmed and operated to use those parameters correctly. This section covers the differences that parameter tables cannot show.

Round tube
- Cutting condition: Uniform. The beam interaction angle changes continuously but smoothly. No abrupt transitions.
- Focus compensation: Consistent around the full circumference — set once and it applies everywhere.
- Speed: Can run at the table value continuously. No corner deceleration needed.
- Weld seam: Single seam at one angular position. Mark the tube or use automatic seam detection to avoid it.
- Best practice: Rotate the tube so the weld seam is at the top or bottom (12 or 6 o'clock) — away from the sidewall cuts where seam-zone variation causes most problems.
Square tube
- Cutting condition: Four flat faces with abrupt 90° corner transitions. Each corner is a new cutting condition.
- Corner effect: At each corner, the beam passes through two walls simultaneously for a brief moment. Without speed correction this causes burn-through or a wider kerf at corners.
- Speed: Reduce speed by 10–15% as the cut approaches each corner, or enable the machine's corner deceleration function (Corner Slow-Down / corner decel). The flat face can run at full table speed.
- Focus: Same value as round tube at the same wall thickness — the flat face is cut like flat sheet, but the focus compensation is already set for the full profile.
- Best practice: Program lead-in/lead-out on the flat faces, not at the corners. Starting a cut at a corner concentrates heat and is the most common cause of poor entry quality on square tube.
Rectangular tube
- Cutting condition: Similar to square, but the long and short faces have different rotary axis dwell times. The axis decelerates more on the long face during a cross-cut.
- Speed: Use the same corner deceleration as square tube. On the long face, the maximum speed from the table is achievable. On the short face, the shorter arc means higher acceleration demand — the motor may not reach full speed before decelerating again on very short profiles.
- Wall thickness asymmetry: If the long and short walls differ in thickness (common on structural rectangular hollow section), use the parameter row for the thicker wall throughout. Using thin-wall parameters on the thick wall produces incomplete cuts at the short-face corners.
- Best practice: For parts with tight corner tolerances, test cut a sample at 80% table speed first, then step up. Corner edge quality on rectangular tube is more sensitive to speed than round or square.
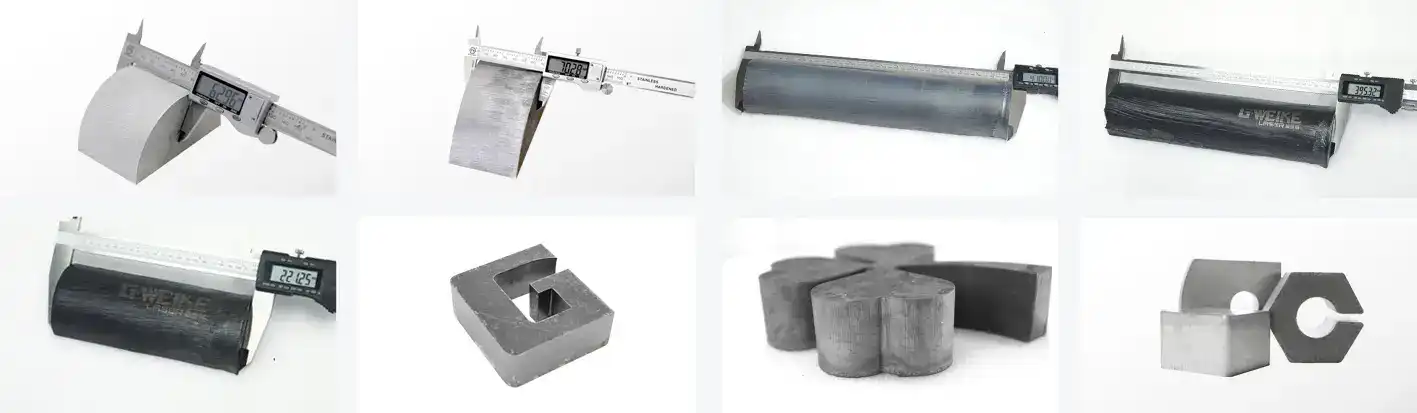
Complete Parameter Tables (1KW–6KW)
All values are reference starting points from production tests on GWEIKE tube cutting systems with standard rotary axis cutting heads. Cutting height is 1mm for all entries (adjust per your cutting head calibration if it differs). The nozzle standoff height sensor should be recalibrated when switching between tube diameters that differ by more than 20mm.
For machine-level specifications including maximum tube diameter and rotary axis feed rates, see the GWEIKE tube laser cutting machine page.
| Wall (mm) | Speed (m/min) | Output (W) | Focus (mm) | Gas | Pressure (bar) | Height (mm) | Nozzle |
|---|---|---|---|---|---|---|---|
| 1 | 4–6 | 1000 | 0 to –1 | N₂ | 10–13 | 1 | Single 2.0 |
| 2 | 4–6 | 1000 | –1.5 to –2 | N₂ | 13–15 | 1 | Single 2.0 |
| 3 | 2–4 | 1000 | –2.5 to –3 | N₂ | 13–15 | 1 | Single 2.0/2.5/3.0 |
| Wall (mm) | Speed (m/min) | Output (W) | Focus (mm) | Gas | Pressure (bar) | Height (mm) | Nozzle |
|---|---|---|---|---|---|---|---|
| 1 | 4–6 | 1000 | 0 to +2 | N₂ | 12–15 | 1 | Single 2.0 |
| 2 | 2–4 | 1000 | +3 to +4 | O₂ | 0.6–0.9 | 1 | Double 1.0/1.2 |
| 3 | 2–3 | 1000 | +3 to +4 | O₂ | 0.6–0.9 | 1 | Double 1.0/1.2 |
| 4 | 1.5–2.3 | 1000 | +3 to +4 | O₂ | 0.6–0.9 | 1 | Double 2.5 |
| 5 | 1.5–1.7 | 1000 | +3 to +4 | O₂ | 0.6–0.9 | 1 | Double 3.0 |
| 6 | 1.2–1.4 | 1000 | +4 to +6 | O₂ | 0.6–0.9 | 1 | Double 3.0 |
1KW: 1mm carbon steel uses N₂ (not O₂) — single nozzle, focus +2mm. This is the key difference from flat sheet, where thin CS often uses O₂. No aluminum or brass data in our production test records for 1KW tube cutting.
| Wall (mm) | Speed (m/min) | Output (W) | Focus (mm) | Gas | Pressure (bar) | Height (mm) | Nozzle |
|---|---|---|---|---|---|---|---|
| 1 | 5–8 | 1500 | 0 to –1 | N₂ | 12–15 | 1 | Single 2.0 |
| 2 | 5–7 | 1500 | –1.5 to –2 | N₂ | 12–15 | 1 | Single 2.0 |
| 3 | 2–4 | 1500 | –2.5 to –3 | N₂ | 12–15 | 1 | Single 2.0/2.5/3.0 |
| 4 | 1.5–2.0 | 1500 | –3.5 to –4 | N₂ | 12–15 | 1 | Single 3.0 |
| Wall (mm) | Speed (m/min) | Output (W) | Focus (mm) | Gas | Pressure (bar) | Height (mm) | Nozzle |
|---|---|---|---|---|---|---|---|
| 1 | 4–6 | 1500 | 0 to –1 | N₂ | 12–15 | 1 | Single 2.0 |
| 2 | 2–4 | 1500 | +2 to +4 | O₂ | 0.6–0.9 | 1 | Double 1.0/1.2 |
| 3 | 2–4 | 1500 | +2 to +4 | O₂ | 0.6–0.9 | 1 | Double 1.0/1.2 |
| 4 | 1.5–2.5 | 1500 | +2 to +4 | O₂ | 0.6–0.9 | 1 | Double 1.0/1.2 |
| 5 | 1.5–2.0 | 1500 | +4 to +5 | O₂ | 0.6–0.9 | 1 | Double 1.0/1.2 |
| 6 | 1.0–1.5 | 1500 | +4 to +5 | O₂ | 0.6–0.9 | 1 | Double 3.0 |
| 8 | 0.8–1.2 | 1500 | +4 to +5 | O₂ | 0.6–0.9 | 1 | Double 3.0 |
| Wall (mm) | Speed (m/min) | Output (W) | Focus (mm) | Gas | Pressure (bar) | Height (mm) | Nozzle |
|---|---|---|---|---|---|---|---|
| 1 | 6–8 | 2000 | 0 to –0.5 | N₂ | 12–15 | 1 | Single 1.5/2.0 |
| 2 | 6–8 | 2000 | –1 to –1.5 | N₂ | 12–15 | 1 | Single 2.0 |
| 3 | 2–3 | 2000 | –2.5 to –3 | N₂ | 12–15 | 1 | Single 2.0 |
| 4 | 2.5–3.0 | 2000 | –3.5 to –4 | N₂ | 15–20 | 1 | Single 2.5 |
| 5 | 1.2–2.0 | 2000 | –5.5 to –6 | N₂ | 15–20 | 1 | Single 3.0 |
| Wall (mm) | Speed (m/min) | Output (W) | Focus (mm) | Gas | Pressure (bar) | Height (mm) | Nozzle |
|---|---|---|---|---|---|---|---|
| 1 | 6–8 | 2000 | 0 to –0.5 | N₂ | 15–20 | 1 | Single 2.0 |
| 2 | 6–8 | 2000 | –1 to –1.5 | N₂ | 15–20 | 1 | Single 2.0 |
| 3 | 2.4–3.6 | 2000 | +2 to +4 | O₂ | 0.6–0.9 | 1 | Double 1.0/1.2 |
| 4 | 1.6–3.0 | 2000 | +2 to +4 | O₂ | 0.6–0.9 | 1 | Double 1.0/1.2 |
| 6 | 1.2–1.5 | 2000 | +3 to +5 | O₂ | 0.6–0.9 | 1 | Double 1.0/1.2 |
| 8 | 1.0–1.5 | 2000 | +3 to +6 | O₂ | 0.6–0.9 | 1 | Double 3.0 |
| 10 | 0.7–1.0 | 2000 | +4 to +6 | O₂ | 0.6–0.9 | 1 | Double 3.0 |
2KW: 1mm and 2mm CS tube use N₂ with single nozzle. The switch to O₂ and double nozzle happens at 3mm wall. Note also: some 2KW configurations use 100/200 optics (Pulseray head) vs 100/125 (standard head) — the 100/200 configuration gives a larger spot size and may require focus adjustment of +0.5mm from these values.
| Wall (mm) | Speed (m/min) | Output (W) | Focus (mm) | Gas | Pressure (bar) | Height (mm) | Nozzle |
|---|---|---|---|---|---|---|---|
| 1 | 5–7 | 1500 | 0 to –1 | N₂ | 12–15 | 1 | Single 2.0 |
| 2 | 5–7 | 2000 | –1.5 to –2 | N₂ | 12–15 | 1 | Single 2.0 |
| 3 | 5–7 | 3000 | –2.5 to –3 | N₂ | 12–15 | 1 | Single 2.0/2.5/3.0 |
| 4 | 4.5–5.5 | 3000 | –3.5 to –4 | N₂ | 15–20 | 1 | Single 3.0 |
| 6 | 1.5–2.0 | 3000 | –5 to –5.5 | N₂ | 15–20 | 1 | Single 3.5/4.0 |
| Wall (mm) | Speed (m/min) | Output (W) | Focus (mm) | Gas | Pressure (bar) | Height (mm) | Nozzle |
|---|---|---|---|---|---|---|---|
| 2 | 6–8 | 2000 | –1.5 to –2 | N₂ | 12–15 | 1 | Single 2.0 |
| 3 | 2.5–3.5 | 2000 | +3.5 to +5.5 | O₂ | 0.6–0.9 | 1 | Double 1.2 |
| 4 | 2.0–3.0 | 2000 | +3.5 to +5.5 | O₂ | 0.6–0.9 | 1 | Double 1.2 |
| 6 | 1.5–2.5 | 3000 | +3.5 to +5.5 | O₂ | 0.6–0.9 | 1 | Double 1.2 |
| 8 | 1.0–1.5 | 3000 | +3.5 to +5.5 | O₂ | 0.6–0.9 | 1 | Double 1.2/1.5 |
| 10 | 1.0–1.5 | 3000 | +3.5 to +5.5 | O₂ | 0.6–0.9 | 1 | Double 1.2/1.5 |
| 12 | 0.5–1.0 | 2200–2400 | +2 to +3 | O₂ | 0.6–0.9 | 1 | Double 3.0 |
3KW: Output power steps up with wall thickness — 1500W for 1mm SS, 2000W for 2mm, 3000W only at 3mm and above. At 12mm CS, output power actually reduces to 2200–2400W with slower focus — this is the stability window for very thick wall O₂ cutting. Fiber core: 100 micron from 3KW.
| Wall (mm) | Speed (m/min) | Output (W) | Focus (mm) | Gas | Pressure (bar) | Height (mm) | Nozzle |
|---|---|---|---|---|---|---|---|
| 1 | 6–8 | 2000 | 0 to –1 | N₂ | 12–15 | 1 | Single 2.0 |
| 2 | 6–8 | 2000 | –1.5 to –2 | N₂ | 12–15 | 1 | Single 2.0 |
| 3 | 4–6 | 3000 | –2.5 to –3 | N₂ | 12–15 | 1 | Single 2.0/2.5/3.0 |
| 4 | 4–6 | 4000 | –3.5 to –4 | N₂ | 12–15 | 1 | Single 3.0 |
| 6 | 2.2–2.5 | 4000 | –4 to –5.5 | N₂ | 15–20 | 1 | Single 3.5/4.0 |
| 8 | 1.5–1.7 | 4000 | –5 to –7 | N₂ | 15–20 | 1 | Single 4.0 |
| Wall (mm) | Speed (m/min) | Output (W) | Focus (mm) | Gas | Pressure (bar) | Height (mm) | Nozzle |
|---|---|---|---|---|---|---|---|
| 2 | 4–6 | 2000 | –1.5 to –2 | N₂ | 16–18 | 1 | Single 2.0 |
| 3 | 3.5–4.2 | 2800 | +3 to +5 | O₂ | 0.6–0.9 | 1 | Double 1.0/1.2 |
| 4 | 2.6–3.2 | 2800 | +3 to +5 | O₂ | 0.6–0.9 | 1 | Double 1.2 |
| 6 | 2.5–2.7 | 2400 | +3 to +5 | O₂ | 0.6–0.9 | 1 | Double 1.2 |
| 8 | 2.0–2.3 | 2400 | +3 to +5 | O₂ | 0.6–0.9 | 1 | Double 1.2 |
| 10 | 1.2–1.4 | 2000 | +3 to +5 | O₂ | 0.6–0.9 | 1 | Double 1.5/2.0 |
| 12 | 1.0–1.2 | 2000 | +3 to +5 | O₂ | 0.6–0.9 | 1 | Double 3.0 |
4KW CS: Note that output power for O₂ cuts at 6mm and 8mm wall is 2400W, not 4000W — cutting at over-rated power on thick O₂ cuts destabilizes the reaction. The rated power ceiling is only reached at full 4000W for thin SS cutting.
| Wall (mm) | Speed (m/min) | Output (W) | Focus (mm) | Gas | Pressure (bar) | Height (mm) | Nozzle |
|---|---|---|---|---|---|---|---|
| 1 | 6–8 | 2000 | 0 to –1 | N₂ | 12–15 | 1 | Single 2.0 |
| 2 | 6–8 | 2000 | –1.5 to –2 | N₂ | 12–15 | 1 | Single 2.0 |
| 3 | 6–8 | 3000 | –2.5 to –3 | N₂ | 12–15 | 1 | Single 2.0/2.5/3.0 |
| 4 | 4–6 | 3000 | –3.5 to –4 | N₂ | 12–15 | 1 | Single 3.0 |
| 6 | 2–3 | 4000 | –4 to –5.5 | N₂ | 15–20 | 1 | Single 3.5/4.0 |
| 8 | 1.5–2.5 | 6000 | –5 to –7 | N₂ | 15–20 | 1 | Single 4.0 |
| 10 | 1.0–1.5 | 6000 | –5.5 to –8.5 | N₂ | 15–20 | 1 | Single 4.0 |
| Wall (mm) | Speed (m/min) | Output (W) | Focus (mm) | Gas | Pressure (bar) | Height (mm) | Nozzle |
|---|---|---|---|---|---|---|---|
| 2 | 4–6 | 3000 | –1.5 to –2 | N₂ | 12–16 | 1 | Single 2.0 |
| 3 | 4–6 | 3000 | –1.5 to –2 | N₂ | 12–16 | 1 | Single 2.0 |
| 4 | 3–4 | 6000 | –1.5 to –2 | N₂ | 12–16 | 1 | Single 2.0 |
| 6 | 2.5–2.7 | 4000 | +3 to +5 | O₂ | 0.6–0.9 | 1 | Double 1.2 |
| 8 | 2.0–2.3 | 4000 | +3 to +5 | O₂ | 0.6–0.9 | 1 | Double 1.2 |
| 10 | 1.4–1.6 | 4000 | +3 to +5 | O₂ | 0.6–0.9 | 1 | Double 1.5/2.0 |
| 12 | 1.2–1.4 | 4000 | +3 to +5 | O₂ | 0.6–0.9 | 1 | Double 3.0 |
6KW CS notable: 2–4mm wall uses N₂ with single nozzle, including 4mm wall at full 6000W. The switch to O₂ + double nozzle happens at 6mm. At 10mm SS tube, focus reaches –5.5 to –8.5mm — the deepest negative focus value in our production test records. Verify focus calibration before cutting at these extremes.
Rated Power vs Actual Output Power
Tube cutting does not run at rated machine power throughout. The output power steps up with wall thickness, and a higher rated machine simply means you reach full output at a thicker wall. This is normal and intentional — tube cutting does not benefit from maximum power on thin walls, and excess power on thin tube causes burn-through and widened kerf.
| Machine rated power | 1mm wall SS | 2mm wall SS | 3mm wall SS | 4mm wall SS | 6mm wall SS | 8mm+ wall SS |
|---|---|---|---|---|---|---|
| 1KW | 1000W | 1000W | 1000W | — | — | — |
| 1.5KW | 1500W | 1500W | 1500W | 1500W | — | — |
| 2KW | 2000W | 2000W | 2000W | 2000W | 2000W | — |
| 3KW | 1500W | 2000W | 3000W | 3000W | 3000W | — |
| 4KW | 2000W | 2000W | 3000W | 4000W | 4000W | 4000W |
| 6KW | 2000W | 2000W | 3000W | 3000W | 4000W | 6000W |
The Weld Seam Problem
All welded tube — which is most industrial hollow section — has a longitudinal weld seam that runs the full length. At the seam, the material properties, surface condition, and internal stress distribution differ from the parent metal. When the laser crosses the seam, these differences affect cut quality in predictable ways.
What happens at the weld seam
The weld zone is typically slightly harder and has a different surface oxide than the parent metal. On nitrogen cutting, this usually causes a slight change in edge roughness at the seam crossing — visible but minor. On oxygen cutting of thick carbon steel, the effect is more pronounced: the weld metal's different carbon composition changes the exothermic reaction rate, sometimes causing a small overburn or underburn at the seam crossing point.
Managing weld seam position
The most effective approach is to ensure the seam does not cross a critical cut edge. For most tube profiles, this means:
- Rotating the tube so the seam sits at the 12 or 6 o'clock position — at the top or bottom of the cross-section where most programs have fewer cuts passing through
- Using the machine's weld seam detection function (if equipped) to mark the seam position and shift it automatically
- On machines without seam detection, mark the tube end with a marker before loading and use a consistent orientation jig
Troubleshooting Tube Cuts
Tube cutting failure modes are distinct from flat sheet. The four problems below account for most field issues on production tube cutting.
Asymmetric cut quality — good on one side, rough on the other
Cause: Focus position error is the most common cause. On tube, an incorrect focus setting produces visible asymmetry because the curved surface amplifies the effect of defocus differently at different circumferential positions. Also check for nozzle misalignment — a slightly off-centre nozzle that is acceptable on flat plate becomes a major quality issue on tube.
Fix: Verify focus setting against the values in Section 2. Run a beam centering check — place alignment paper over the nozzle and fire a low-power pulse. The burn mark must be centred. If it is not, adjust collimator position. If beam is centred but quality is still asymmetric, increment focus by –0.5mm and retest.
Poor cut quality at square tube corners
Cause: Speed too high through the corner transition. At each corner the beam angle relative to the material surface changes abruptly, and the machine must decelerate and re-accelerate. If corner deceleration is not enabled or set correctly, the machine overshoots and produces a burnt or widened corner kerf.
Fix: Enable the corner deceleration function in the cutting program (Corner Slow-Down / corner decel setting). Set corner deceleration to 80–85% of straight-face speed as a starting point. If the controller does not have this function, reduce global cutting speed to 85% and accept slightly lower throughput on the straight faces. Do not attempt to compensate with reduced laser power — corner burns are a kinematic issue, not a power issue.
Slag or dross attached to the inside of the tube
Cause: Tube cutting inherently ejects some molten material inward. At low gas pressure or incorrect nozzle height, the proportion of inward ejection increases significantly. This is a structural difference from flat sheet cutting — flat sheet has no enclosed space to trap ejected material.
Fix: Increase gas pressure by 1–2 bar. Verify cutting height is exactly 1mm — higher standoff reduces the gas jet's ability to direct ejected material away from the bore. If inner-wall slag is a hard quality requirement, consider applying a release spray to the inner bore before cutting (used on high-end tube cutting machines automatically). On short cut sequences near the tube end, the enclosed volume is smaller and inward dross is worse — program lead-ins to start cuts at least 10mm from the tube end.
Cut quality deteriorates at the weld seam crossing
Cause: The weld zone has different hardness, oxide layer, and sometimes slightly different surface height than the parent metal. For O₂ cutting, the different carbon composition in the weld metal changes the exothermic reaction rate. For N₂ cutting, the denser oxide at the seam requires slightly higher energy to cut cleanly.
Fix: Reposition the tube so the seam crosses the cut at an angle rather than perpendicularly — an angled crossing distributes the seam effect over a longer arc. Reduce speed by 10% in the seam zone if the controller supports it. If quality is critical at the seam position, use a machine with automatic seam detection (SeamLine or equivalent), which adjusts parameters dynamically as the seam passes through the cut zone.
Need parameters for your specific tube spec?
The tables above cover wall thickness as the primary variable. Tube outer diameter, profile tolerances, alloy grade, and cutting head configuration all affect the usable parameter window. Our applications team can run test cuts on your material and confirm suitable starting parameters before you commit to a production run.
FAQ
Why are tube cutting parameters different from flat sheet parameters?
Five structural differences apply: (1) Focus must be more negative on tube to compensate for curved surface reducing effective focal depth. (2) Thin carbon steel tube uses nitrogen rather than oxygen — curved surfaces and weld seams make O₂ reactions uneven on tube. (3) Speed is capped by the rotary axis mechanics, not the laser — tube speeds are 5–8× lower than flat sheet at the same power. (4) Nozzle standoff is fixed at 1mm for all tube cutting versus 0.5–1.5mm on flat plate. (5) Actual output power steps up with wall thickness rather than running at full rated power throughout.
What focus position should I use for laser tube cutting?
For stainless steel N₂ cutting: 1mm wall 0 to –1mm; 2mm wall –1.5 to –2mm; 3mm wall –2.5 to –3mm; 4mm wall –3.5 to –4mm; 6mm wall –4 to –5.5mm; 8mm wall –5 to –7mm. These are reference values from the parameter tables above, based on GWEIKE production tests. For carbon steel O₂ cutting, the focus is positive: 2–4mm wall +2 to +4mm; 6–10mm wall +3 to +6mm. The rule of thumb is: every additional 1mm of wall thickness requires approximately 0.5–0.7mm more negative focus for N₂ stainless cutting.
Why does thin carbon steel tube use nitrogen instead of oxygen?
On flat plate, thin carbon steel is often cut with oxygen for speed. On tube, nitrogen is preferred for 1–2mm carbon steel because the curved surface makes the O₂ exothermic reaction uneven around the circumference, and the weld seam zone responds differently to oxygen than the parent metal. Nitrogen gives consistent results regardless of seam position or surface variation around the tube. Oxygen is still used for thicker carbon steel tube (3mm and above) where its penetration advantage outweighs the uniformity issue.
Why is tube cutting speed so much lower than flat sheet at the same power?
The speed limit is the rotary axis mechanics, not the laser. A 6KW system that cuts 1mm SS flat sheet at 40–50 m/min cuts the same material as tube at only 6–8 m/min. The rotary motor, collet chuck dynamics, and the vibration characteristics of a spinning tube all cap the practical feed rate. Attempting flat-sheet speeds on tube causes vibration, positioning errors, and quality problems. The laser is not the limiting factor — adding more laser power does not increase tube cutting speed significantly.
Do I need different parameters for round tube vs square tube?
The parameter table values — speed, focus, gas, pressure, nozzle — are the same for round and square tube of the same wall thickness. The difference is how you program and operate the cut: square tube requires corner deceleration (reducing speed by 10–15% as the cut approaches each 90° corner) to prevent overburn. Round tube runs at constant speed throughout. Rectangular tube follows the same corner deceleration rule as square tube, and if the long and short walls differ in thickness, use the parameter row for the thicker wall throughout.
The rated power and the output power in the tables are different — is this correct?
Yes, this is correct and intentional. A 3KW machine cutting 1mm SS tube runs at 1500W output — the same as a 1.5KW machine would use. Tube cutting steps output power up with wall thickness; the rated power is a ceiling, not a fixed operating point. Running maximum rated power on thin tube causes burn-through and poor cut quality. The advantage of a higher-rated machine on thin tube is adjustment margin, not speed — and it reaches full output sooner as wall thickness increases.