Identify what aluminum pipe you are cutting
“Aluminum pipe” sounds like one material, but in real work it shows up as many shapes and finishes: round pipe, square tube, rectangular tube, and aluminum profiles (channels, angles, and custom extrusions). Your best cutting method depends on four simple factors.
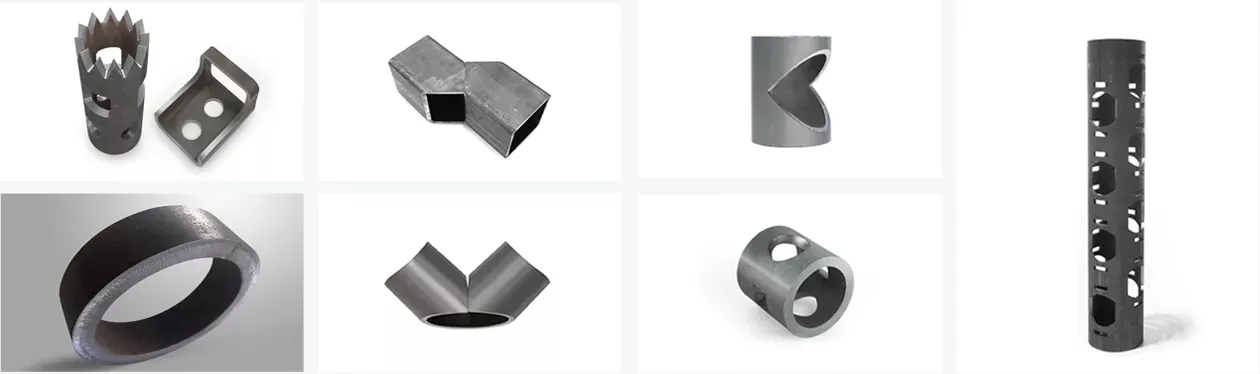
For aluminum pipe and profile production, choose an aluminum tube laser cutting machine with suitable laser power, chuck stability and parameter control.
Step 1 Shape and size
Round tubing wants to roll. Square tube wants to twist if clamping is weak. Profiles can vibrate if unsupported. The “best tool” changes based on how well you can hold the workpiece.
Step 2 Wall thickness
Thin-wall tube is easy to crush and ovalize. Thick-wall pipe is stable, but can still burr if blade choice and feed are wrong. Thickness mostly decides clamping strategy and blade/tooth choice.
Step 3 Surface finish
Raw aluminum forgives small scratches. Anodized or powder-coated tube does not. If appearance matters, protect the surface and reduce vibration.
Step 4 Quality requirement
A hidden cut just needs deburring for safety. A visible cut needs a cleaner edge and consistent length. A weld/fitting cut needs correct squareness and good edge prep.
If you are cutting one piece, speed is not your bottleneck—setup is. If you are cutting hundreds of pieces, finishing and rework become the bottleneck. The “right tool” is the one that reduces total time (cut + deburr + rework), not just the cutting time.
Safety and setup
You do not need complicated safety language here. You need practical habits that avoid injuries and keep your cuts accurate. Aluminum cutting creates sharp edges and chips. Grinding creates fine dust. Saws and grinders are loud. If you control those three things, most jobs go smoothly.
Eye + face
Safety glasses for every cut. Add a face shield for grinders or if chips bounce toward your face.
Hearing
A miter saw or grinder can be loud enough to cause hearing damage in short sessions. Use hearing protection.
Dust + chips
Keep chips off the floor and off clamping surfaces. If you grind a lot, control fine dust with extraction and cleaning.
Most “bad cuts” are not tool problems—they are holding problems. If the tube moves, rolls, or vibrates, the blade grabs, the edge tears, and the finish gets scratched. Before you blame the blade, lock down the workpiece.
- Stop the roll: use a V-block, pipe vise, or a simple wood cradle for round pipe.
- Support both sides: long pipe needs a stand so the off-cut does not drop and pinch the blade.
- Plan the last 10%: slow down at the end to prevent tearing and burr spikes.
- Keep contact surfaces clean: one small chip under a clamp can scratch anodized tube instantly.
The “aluminum traps”: why your cuts smear, burr, or go crooked
Aluminum is softer than steel. That makes it cut fast, but it also creates three common traps. If you understand them, you can fix most problems in minutes.
Trap A: blade loading
When aluminum chips stick to blade teeth, the blade stops cutting cleanly. The cut edge looks “torn” or smeared. You may hear squealing, feel grabbing, and see heavy burr. The fix is usually simple: use a non-ferrous blade, clamp better, and use light lubrication (wax or a controlled mist).
Trap B: thin-wall tube crush
If you clamp thin-wall tube like steel, it can flatten. Once flattened, your cut can go out-of-square and your parts may not fit. This is why soft jaws and internal supports matter. You do not need expensive fixtures—often a small insert near the cut zone is enough.
Trap C: burr and sharp edges
Burr on aluminum can be razor sharp. It also blocks fittings, scratches seals, and makes weld prep harder. The best approach is not to chase “zero burr” (rare in real shops), but to aim for small burr that removes fast with a repeatable finishing routine.
Tool selection guide (choose based on wall thickness, accuracy, and volume)
Below is a practical tool map. Use it to match your job to the most reliable workflow. Think in terms of total time: setup + cut + deburr + rework.
| Tool / Method | Best for | Strengths | Watch-outs | Quality level (typical) |
|---|---|---|---|---|
| Tubing / pipe cutter | Thin-wall round tube, small diameters, quiet work | Very straight cut line; minimal mess | Leaves inside ridge; can ovalize if tightened too hard | Clean edge, but must deburr inside |
| Miter / chop saw + non-ferrous carbide blade | Shop work, straight/angle cuts, visible frames | Fast, square cuts; good finish with proper setup | Blade loading if dry and dirty; needs good clamping | High if vibration is controlled |
| Band saw | Controlled cuts, thicker walls, repeat jobs | Stable and predictable; lower grabbing risk | Wrong blade pitch can tear thin tube; needs support | Medium–high, depends on setup |
| Angle grinder + cut-off wheel | Field work, fast rough cuts, tight access | Works anywhere; quick | More burr; easier to go out-of-square; sparks and dust | Medium, finishing required |
| Recip saw / hacksaw | On-site cuts where saws won’t fit | Portable and flexible | Can wander; can chatter; more finishing | Low–medium |
| CNC tube fiber laser | Batch production, holes/slots/notches, repeat geometry | High consistency; can cut features in one run; less rework | Needs programming and correct machine sizing | High, scalable |
If you cut only straight pieces occasionally, a saw + deburr routine is enough. If you repeatedly cut the same lengths, add a stop block or simple fixture. If you need holes/notches and repeat geometry, CNC tube laser starts making sense quickly.
Measure and mark straight (the easiest way to improve accuracy)
Your cut quality often starts with marking. A perfect saw cannot fix a crooked mark. These marking methods are simple and work well for aluminum pipe and tubing.
-
Method 1: wrap-around tape (fast and accurate)
Wrap masking tape around the tube once. Align the tape edges so they meet cleanly (no gap, no overlap).
Use the tape edge as a straight guide line.
Why it works: the tape edge becomes a “square” reference around the circumference.
-
Method 2: paper/strap wrap (for larger diameters)
Wrap a strip of paper around the pipe and align the edges. When the edges align, the paper edge is square.
Trace along it to mark a clean cut line.
Tip: a thin plastic strap works well and does not tear as easily as paper.
-
Method 3: stop block (for repeated lengths)
If you cut many parts at the same length, use a simple stop block on your saw fence or jig.
Then you measure once and cut repeatedly without re-measuring.
This is often the biggest “time saver” for small production.
Clamp without crushing (thin-wall aluminum tubing tips)
Thin-wall aluminum tube is easy to dent. If your tube looks oval after cutting, the problem is usually clamping. The goal is to hold the tube firmly without concentrated pressure.
Use soft jaws (or soft pads)
Put rubber, leather, wood, or soft plastic between the clamp and the tube. This spreads pressure and reduces dents. It also protects anodized finishes.
Add an internal support (simple insert)
If the tube is very thin, insert a short piece of wood, plastic, or a snug scrap tube inside near the cut zone. This supports the wall and makes crushing much less likely.
Support long stock to reduce vibration
Long tubes vibrate and whip. Use stands or rollers to support both sides. Vibration creates rough edges, heavy burr, and scratches.
Do not “over-clamp” to feel safe. Over-clamping thin tube can create a permanent oval shape. Use better support, not more force.
Method 1: Tubing / pipe cutter (very straight for thin-wall round tube)
A tubing cutter is slower than a saw, but it can produce very straight cuts on thin-wall round tubing. It is also quiet, clean, and convenient for maintenance work.
How to do it (simple steps)
- Mark your cut line.
- Place the cutter wheel on the line and tighten until it touches firmly.
- Rotate around the tube. After each full turn, tighten a little (small steps).
- Continue until the tube separates.
- Deburr inside and outside. Tubing cutters often leave an internal ridge.
- If the wall is thick and cutting becomes slow or difficult
- If the tube must remain perfectly round for precision fit
- If you need profiles, holes, notches, or complex geometry
- Use a non-ferrous carbide blade (designed for aluminum).
- For thin-wall tube, a finer tooth count usually leaves a cleaner edge.
- For thicker walls, a slightly coarser blade can cut more efficiently without overheating.
- Avoid “random wood blades” unless you are sure they are safe and appropriate for aluminum.
- Clamp the tube firmly so it cannot rotate or slide.
- Support the off-cut so it does not drop and pinch the blade.
- Keep the fence and clamps clean (chips under clamps cause scratches and skew).
- Let the blade reach full speed before entering the cut.
- Use steady feed (don’t slam down; don’t “hover” too slowly either).
- Make a light “touch” to confirm the blade tracks your line.
- Cut with steady pressure. If you feel grabbing, pause and re-check clamping and support.
- Slow down in the last 10% to prevent edge tearing.
- Deburr lightly after cutting.
- Wrap the cut area with masking tape.
- Use soft pads under clamps and avoid sliding the tube after clamping.
- Remove chips from the fence and support blocks before each cut.
- Deburr with a fine tool—light touch only on visible surfaces.
- Blade pitch matters: thin-wall tube generally needs a finer pitch so teeth do not “catch” and tear.
- Support the tube: vibration is the enemy of straight cuts.
- Feed steadily: pushing too hard can make the blade wander.
- Watch chip clearing: if chips pack up, your edge quality drops and the blade heats up.
- Thicker walls, where controlled cutting helps
- Repeat work that benefits from stable alignment
- Shops that want a calmer cutting process with less “grab risk”
- Clamp the tube so it cannot roll.
- Score a shallow groove around the line first (one light pass).
- Cut deeper on a second pass, following the groove.
- Slow down near the end to reduce tearing.
- Deburr inside and outside.
- Use a blade intended for metal and keep the tube supported close to the cut.
- Start slowly so the blade does not jump and scratch the finish.
- Accept that you will need a quick finishing pass afterward.
- Hand deburring tool for quick passes
- Fine file for small burrs
- Light flap wheel touch (only if surface is not appearance-critical)
- Reamer or chamfer tool
- Small round file for quick touch-up
- Deburr until fittings seat smoothly
- Use a stable miter saw with a non-ferrous blade and strong clamping.
- Protect finishes with tape and clean contact pads.
- After cutting, do a light deburr so the joint closes tightly.
- Volume is growing: you cut many pieces per day/week and want consistent results.
- Geometry is growing: you need holes, slots, notches, tabs, text marking, or repeated joints.
- Rework is painful: you spend too much time “making parts fit” after cutting.
- Quality is important: you need consistent lengths and joint fit-up for assembly.
- Confirm tube OD, wall thickness, and raw length (6m / 9m / 12m style jobs).
- Prepare CAD for cut lines + holes + notches.
- Program and nest parts to reduce scrap and keep consistent feature positions.
- Load, clamp, support, and run the job.
- Do light finishing only where needed (often less hand work than saw workflows).
- Tube shape: round / square / rectangle / profile
- Size range: OD / side length and wall thickness
- Raw tube length: typical stock length
- Material: common aluminum alloy, surface finish
- Batch size: per day/week
- Features: straight cuts only, or holes/slots/notches/text
- Quality target: visible edge vs functional edge
- Automation: manual / semi-auto / full auto
- GWEIKE Tube Laser Cutting Machines
- How to Cut Steel Pipe
- How to Cut Copper Pipe
- How Does Laser Cutting Work
- How to Use a Laser Cutting Machine
- How Thick Can Fiber Laser Cut
- Fiber vs CO2 Laser Cutting
- What Is an Industrial Laser Cutting Machine
- Laser Cutting Stainless Steel
- How Much Is an Industrial Laser Cutting Machine

When to avoid a tubing cutter
Method 2: Miter / chop saw
For most shop work—frames, rails, brackets, general fabrication—a miter/chop saw with the right blade is the simplest way to get clean, square cuts in aluminum. The key is not complicated: use a blade designed for non-ferrous metals, clamp properly, and feed steadily.
Blade choice
Reduce blade loading (why wax/lube helps)
Aluminum chips can stick to teeth and reduce cut quality. That shows up as squealing, grabbing, and burr. Many shops use a blade wax stick or controlled lubricant to reduce friction and keep chips moving. Keep it light—too much lubricant makes a mess and can collect chips.
Setup checklist (do this before every cutting session)
Cutting technique
How to cut anodized tube without visible scratches
A good aluminum cut edge looks smooth, with a small burr that removes in seconds. If you see heavy burr, smearing, or dark heat marks, treat it as a setup issue: holding, blade choice, feed, and chip control.
Method 3: Band saw (controlled, production-friendly, low grabbing)
Band saws are a dependable way to cut aluminum tube and pipe, especially for thicker walls or repeated work. They cut at lower speed than many chop saws, which can reduce grabbing and make the process feel more controlled.
Band saw tips that keep cuts straight
When a band saw can be the better choice
Method 4: Angle grinder and field tools (fast access, more finishing)
Sometimes you cannot bring the work to the saw. Installed pipe, tight spaces, and repair jobs often force you to use field tools. These tools can work well—but you should expect more deburring and squaring.
Angle grinder: how to make the cut straighter
Recip saw / hacksaw: best practices
Oscillating tool: slow but controllable
For small tubing in tight spots, an oscillating tool is slow but precise. It is a reasonable option if access is your main problem. Treat it as a “get it done safely” tool, not a production tool.
Deburring and edge prep
This is where aluminum parts become “shop-grade.” You do not need fancy finishing. You need a repeatable routine. The goal is to remove sharp burr and create a small clean edge—especially on the inside where fittings and hands will touch.
Outside edge (fast routine)
Tip: If the tube is anodized, avoid aggressive abrasives on visible surfaces.
Inside edge (often overlooked)
Inside burrs can block fittings and cut seals. A 10-second inside deburr saves long troubleshooting later.
If the pipe will be welded
For welding prep, the main goals are: clean edge, good fit-up, and a consistent joint. Deburr the edges, remove surface contamination near the joint, and keep the joint area clean. If you are doing many tube joints (notches/fishmouth), manual prep can become a major time sink.
Heavy grinding makes edges hotter, rougher, and less consistent. For most aluminum tube work, light deburring beats aggressive grinding.
Special cuts: miters, notches, fishmouth joints
Straight cuts are the easy part. Real projects often need angle cuts and tube-to-tube joints. Here are practical ways to handle them without turning the job into a guessing game.
Miter cuts (frames, rails, and corners)
Tube notching / fishmouth (tube-to-tube joints)
A fishmouth notch helps a round tube fit another round tube. Manual options include a tube-notcher jig with a hole saw, or careful grinding and test fitting. If you do notches often, this becomes one of the biggest labor costs in tube fabrication.
Holes and slots: keep them practical
If you drill holes after cutting, keep a simple rule: drill marks and pilot steps prevent wandering. If you move toward CNC cutting, you can integrate holes and slots into the cutting program and reduce secondary operations.
Troubleshooting: common aluminum pipe cutting problems (and quick fixes)
When the cut quality drops, it is usually not random. Use this section as a quick diagnosis tool. Look at the symptom, then check holding, blade/tool choice, and feed.
| Problem | What it usually means | Fast fixes (in order) | Prevention habit |
|---|---|---|---|
| Heavy burr | Vibration, wrong blade, poor chip clearing, too aggressive feed | Clamp better → use non-ferrous blade → steady feed → light wax/lube → deburr routine | Clean fence + stable support every session |
| Smearing / shiny “melted” edge | Blade loading (chips sticking), heat buildup | Clean blade → wax/lube lightly → reduce “hovering” slow feed → improve support | Do not cut with a dirty blade |
| Tube is oval or dented | Clamping pressure too high; no soft pads; no internal support | Soft jaws/pads → insert support → clamp less → support near the cut | Set a “standard clamp method” for thin-wall tube |
| Cut not square | Marking error, tube moved, off-cut dropped | Wrap-mark again → add stop block → support off-cut → slow last 10% | Measure once, then repeat with a stop |
| Scratched anodized surface | Chips under clamps or fence; sliding after clamping | Clean contacts → tape protection → soft pads → avoid sliding motion | “Clean-first” habit before every cut |
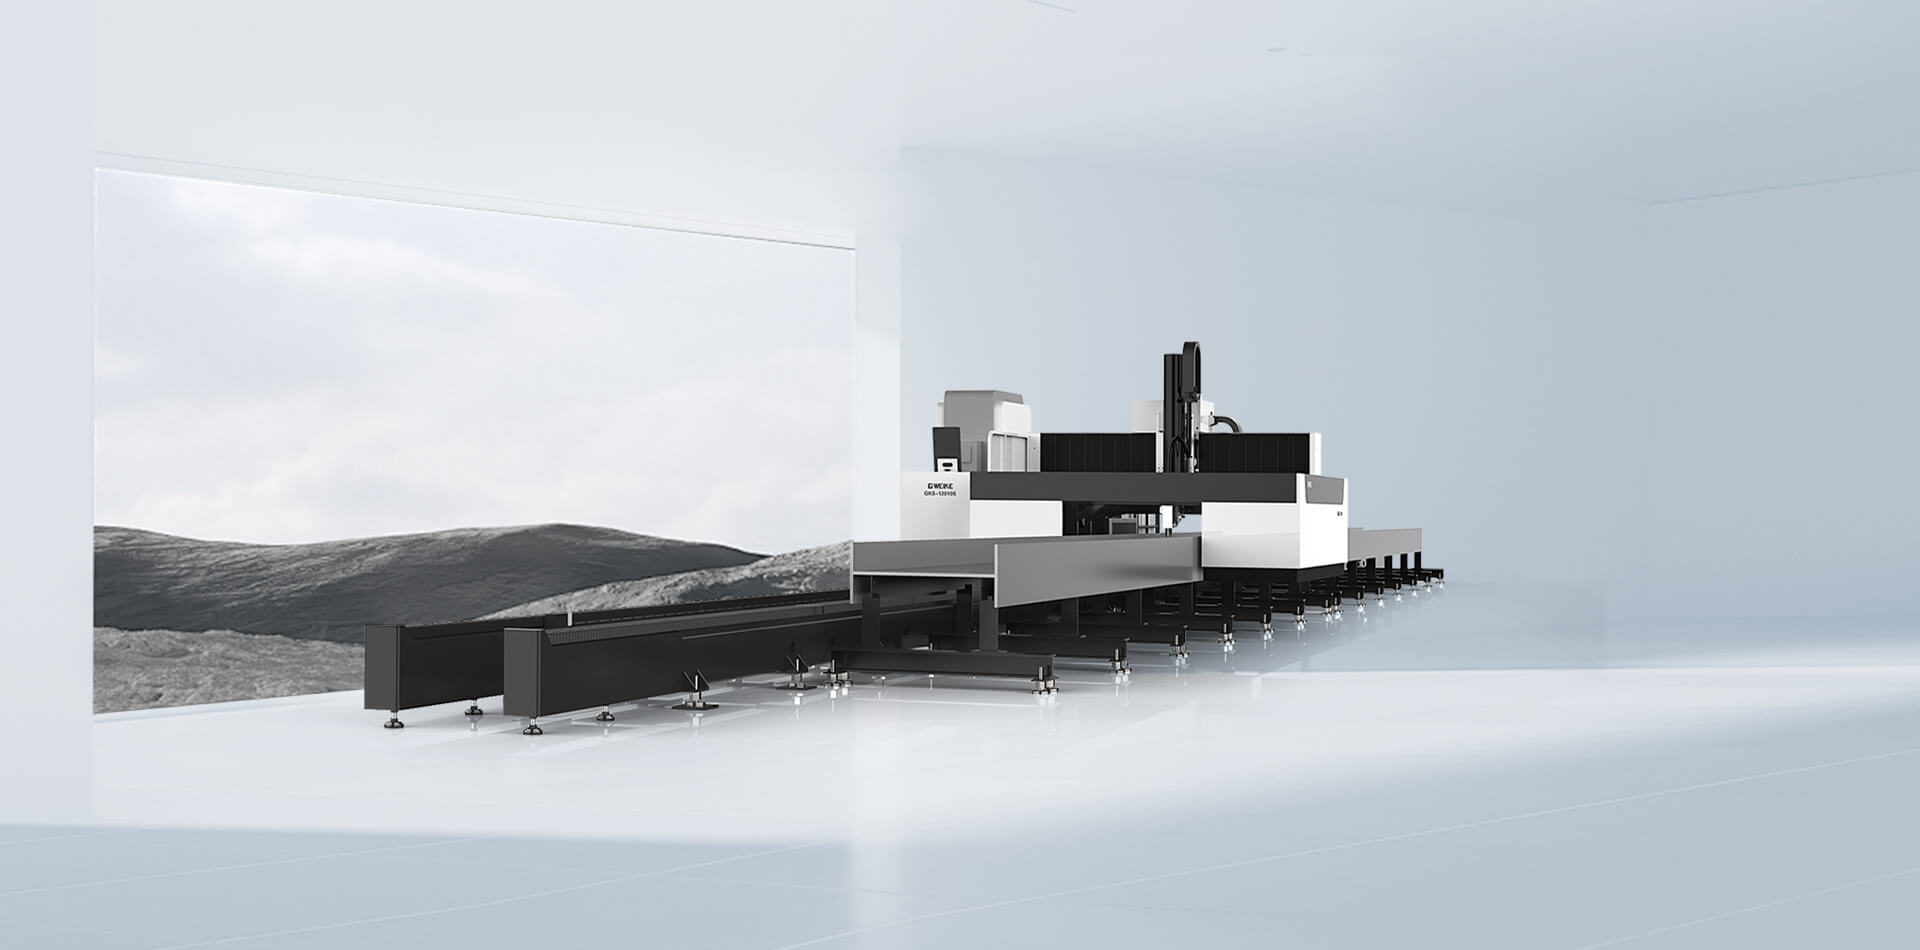
When manual cutting stops scaling: move to CNC tube fiber laser cutting
Manual cutting is fine for low volume and simple geometry. The problem is that labor grows fast as parts get more complex. If you are repeatedly measuring, repeatedly deburring, and repeatedly reworking joints, you are paying hidden costs.
For batch cutting of aluminum pipe, square tube and structural profiles, compare GWEIKE tube laser cutting machines by chuck range, tube length, automation level and recommended model.
Signs it is time to consider CNC tube laser
A plain tube-laser workflow (simple steps)
If you want the general background, link readers to your existing guides instead of repeating them here: How laser cutting works, How to use a laser cutting machine, and Fiber laser thickness ranges.
Product-fit section: Recommended GWEIKE machines for aluminum pipe cutting
This section promotes products in a practical way: match machine type to your real tube jobs. The right choice depends on tube size range, raw tube length, load weight, and whether you want automation. Use the scenarios below as a shortlist.
To compare machine structures, chuck systems, tube length options and recommended models, visit GWEIKE tube laser cutting machines.


The goal is to choose a machine that fits your most common jobs, not the “largest possible” machine. Oversizing often wastes budget. Undersizing causes production bottlenecks. If your jobs are mixed, choose based on the jobs you run every week.
Scenario A: small tubes, fast cycling
If your aluminum tube jobs are mostly small diameter and you want a compact workflow that cuts efficiently, consider the TE-Series automatic tube cutting platform.
Suggested link: TE-Series (Tube)
Scenario B: mainstream tube sizes, daily fabrication
If you cut common round/square tubes every day and want a practical “general purpose” platform, the T2 Series is a straightforward shortlist option.
Suggested link: T2 Series
Scenario C: tube + profile jobs
If you frequently cut not only round/square tube but also profiles/extrusions, look at a tube + profile solution, such as TG Series.
Suggested link: TG Series (Tube & Profile)
Scenario D: heavier tubes and stronger stability
If you process heavier workpieces or want more stability for long tubes, a heavy-duty platform such as T3 Series is often the better fit.
Suggested link: T3 Series
Scenario E: long-tube workflow (long loading/unloading)
If your production uses long raw tubes and you care about stable handling across length, consider a long-tube focused platform like T3L.
Suggested link: T3L Series
Scenario F: large diameter or very heavy tubes
If you cut large diameter or heavy aluminum pipes and want stronger multi-chuck stability, a heavy-duty option like T4 Series is designed for those cases.
Suggested link: T4 Series
If you want to see all sheet + tube + 3D robot fiber platforms in one place, use the hub page and filter by your job type.
Tip: For faster recommendations, prepare your tube sizes, wall thickness range, raw length, and the features you need (holes/notches/slots).
RFQ checklist + related guides
RFQ checklist: what to prepare before requesting a quote
If you want fast and accurate machine recommendations, send these details. This avoids back-and-forth and helps match the machine configuration to your real jobs.